Today Mat and I played the planned battle with my Confederates having units: 4 Infantry, 4 Cavalry and 4 cannons versus Union units: 6 Infantry, 1 cavalry and 2 cannons. My force was deemed as somewhat more powerful, so Mat was allowed (without dice rolls) to make me set up first and he got first turn.
I expected setting up first would be a big handicap but this time it wasn't. I held back on my left flank but still tied up a Union infantry and cavalry unit that were awaiting my advance from a unit of cavalry that never came. My infantry was deployed on my left flank but towards the center. My four guns deployed in the center as a battery. One infantry regiment was deployed on my right flank. Three units of cavalry were also on the right flank towards the gun battery.
Mat's infantry deployed across the field and his cavalry was on his right flank. The two cannons were on the right towards the center.
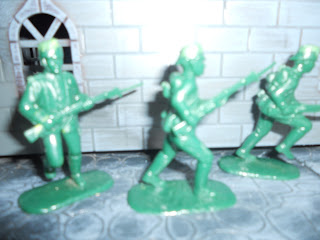
BELOW: Confederate battle lines from the CSA right flank,
Colonel Reverend George Hollows advances his regiment towards the 'damned Yankees'. The reverend was once misquoted as saying, 'An eye is an eye' when he actually said, 'An eye for an eye'. He lost his only son at First Bull Run and he wanted to take more than 'one eye' for his loss.
The Confederate cavalry has begun to swerve to the right in support of this daring advance.
Union infantry lines gradually advanced in the center, The regiment in greatcoats swerved to the left to meet the advancing Confederates.
On the Confederate left flank the Texan infantry moved slightly forward but only to form firing lines.
Bedford Bolton's cavalry move up behind the Reverend's infantry that have changed to skirmish line. To the right Colonel Plucket also advances.
Charge! The Union infantry were assaulted by the cavalry as the Confederate skirmishers moved aside.
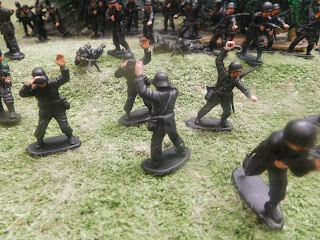
A third cavalry regiment also charged the Union infantry that had turned to assist the other Union troops to their left. However, this exposed their flank! In the end the Confederate cavalry was able to sweep around to capture the Union artillery and General 'Furious' George.
Happier times, before the flank attack!
Furious George displayed his usual fire and refused to surrender. He drew his sword and met Death face on. He was an extreme abolitionist from the days of the mini-civil war in 'Bleeding Kansas'. He had been an associate of John Brown but was not at the Harpers Ferry incident and so escaped earlier death in battle or execution. The Confederates new his reputation well and did not try to coax a surrender from him but cut him down with pleasure.
ANALYSIS
So ended the battle with the Union forces that remained abandoning the field. Over half the Union force had perished or routed. The Confederates lost one infantry unit routed and another unit under 50%.
The Confederate artillery had scored some deadly long and medium range hits on enemy infantry early in the battle and were able to destroy attacking Union cavalry. Deployed in the center they made the middle of the battlefield deadly to Union troops. The large cavalry contingent gave the Confederates more flexibility in concentrating forces on one flank. The tactic of infantry skirmish screen enabled my cavalry to advance unmolested until they got into charge range.
If my artillery had been less accurate to begin with and mat had been able to concentrate his infantry fire things might have gone down differently. His artillery was also not very effective as it was mainly firing from extreme range.
FIGURES
These are relatively small games and used only a small portion of my ACW forces. However, I decided to use my two hollow-cast units. I'm pleased with the look of these figures. They have received additional sticky paper tape - and putty equipment as well as some Mexican War type caps on most of the marching poses. The cavalry I covered in my previous post.
You can see from the last photos of the pile in on General Furious George that there is a size discrepancy between the old hollowcast and the TSSD, Imex, Accurate and other more recent figures that are quite a lot more chunky and larger than the metal figures. Yet they are all intended as 1/32.
NEXT GAME
Next game will be the SF scenario I discussed not long ago.


Comments
Post a Comment