Campaign Battle Map Move 13, King James' Army Besieges Fezian Castle
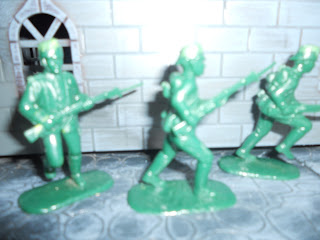
Fezian lights and plate armored infantry line up in front of the Eastern wall.


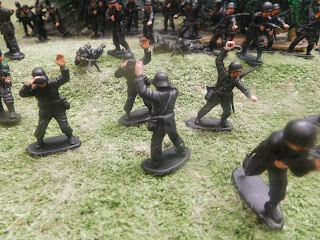
Beersteiner musket troops maintained a formidable firing line.


.jpg)


King James had followed, with his personal force, his various armies South and then North in Beerstein until finally East into Fezian territory. He had been too late to assist against the Fritz invasion, in the South and then too late to join the sieges of Fezian castles. However, he had picked up reinforcements from Beerstein villages. Some of these he had dispersed in various deserted Fezian lands. He had also left some forces and his archbishop and priest, in the Capital, to guard against any incursions from the Hillmen, Chaos, Necrolia or the Dark Elves. Now he had collected captured Fezian supplies and turned South/East. he approached the Fezian castle from the East.
King James was an intelligent commander who took his time until the right moment. He lined up his muskets and longbows in a formidable firing line and waited for his artillery to arrive.
Commander Marmaduk, of Fezia lacked the military intelligence of King James' army. Where would it arrive? Consequently, he placed his forces in the castle and around its base. Then the enemy arrived from the East. The red and yellow clothes Beersteiners had a smaller force than his, but they seemed very well disciplined. He ordered his men not to advance unless their numerical advantage could be put to good use.
Meanwhile Umonara was busy with his magic. Last campaign he had been captured by the Beersteiners and his self-preservation told him to change sides to the winning side. Using the lore of life he cast the spell, Throne of Vines which gave him protection from misspells and enhanced the power of his other spells. The first spell would protect him from one misspell and it also enabled him to bring back to life a number of fallen crusaders.
King James' musketeers stayed out of range of the archers on the eastern wall and instead targeted the Fezian troops outside the wall; the casualties began to mount up. On the Northeastern part of the battlefield the mounted crusaders were itching to charge the enemy. Finally, they could contain themselves no longer and charged into the Fezian light infantry and plate cavalry. A unit of light mercenary cavalry joined them. This was an ironic sight as the lights hailed from the land of Chaos. They insisted they no longer followed the dark Gods but hey still carried the evil Eye symbols on their shields and flag.
The Beersteiner attack occurred on the strong Fezian's left flank and would prove costly. The weight of numbers, from the Fezians began to tell, but the forceful Beersteiner charge had caused enormous damage, virtually wiping out three Fezian units. The counter charge of the latter's cavalry and infantry also wiped out a unit of crusaders and the mercenary light cavalry. The remaining crusader unit was (again ironically) boosted by Umonara as he brought back to life the fallen.
Meanwhile the Fezian archers on the Eastern wall moved to the Northern one but, among the swirling melees below could find no safe targets. The archers on the Southern wall had no targets. However, the long bows of Beerstein swept the Northeastern tower of its artillery crew before they could target the Beersteiners.
On the Beersteiner's left flank they edged forward but met a powerful attack from Fezian lights and plate infantry. Prince Frederick met his end leading the Beersteiner heavy infantry who were completely wiped out. Even so, the Beersteiner musket men and the mercenary mounted archers formed a firing line which decimated the Fezians.
The Beersteiner artillery finally arrived and slowly took position and unlimbered into a single battery. They began firing at the eastern wall in an attempt to bring it down. Their firing was ineffectual as they either fell short or could make no inroads against the thick walls. Then a disaster struck as two guns misfired and blew up, killing their crews. Next the remaining guns targeted the weaker door, finally hitting and destroying it.
The Fezian archers on the Northern and Southern walls turned to face the courtyard, in preparation for the expected Beersteiner assault. heavy spearmen took position behind wagons blocking the entrance. However, as darkness fell King James called for a stop to the assault and to reposition troops under cover of darkness.
The battle is certain to recommence the next day.
BACKGROUND TO RULES AND FIGURES
As this is a fantasy campaign, medieval, ancient and 17thc century troops are indiscriminately intermixed.
My sources of figures are many and includes A Call to Arms English Civil War, ancient, Zulu and Sudan colonial war troops, Biblical infantry, and many assorted brands for knights, longbow men Africans Arabs. The Fezian forces tend to be more inter-racial and reflects the nature of its empire.
The Fezian special troops are its light mounted archers whereas the Beersteiner mounted archers are all mercenaries, mostly adventurers or refugees from the Silver Horde. Fezians also have short bows as opposed to Beersteiner longbows, but these are cheaper to recruit. Longbow units are costly and tend to be restricted to one unit. Some Fezians have plate armor of the same class as the Beersteiner knights and crusaders. The difference is they must take a leadership test to go into melee whereas Beersteiner knights and crusaders need to roll leadership tests to NOT go into combat (once within 60 cm of the enemy) hence an early assault be the mounted crusaders.
The Fezian special troops are its light mounted archers whereas the Beersteiner mounted archers are all mercenaries, mostly adventurers or refugees from the Silver Horde. Fezians also have short bows as opposed to Beersteiner longbows, but these are cheaper to recruit. Longbow units are costly and tend to be restricted to one unit. Some Fezians have plate armor of the same class as the Beersteiner knights and crusaders. The difference is they must take a leadership test to go into melee whereas Beersteiner knights and crusaders need to roll leadership tests to NOT go into combat (once within 60 cm of the enemy) hence an early assault be the mounted crusaders.
Although matchlocks are available to Fezians they have tended to prefer short bows. The relative advantages of bows (except for crossbows) is that the wielder may move a half move and fire. Musket men can move or shoot. The musket fire is more damaging to armor than arrows. On the other hand, the targets of arrows get a saving throw of 6 on a D6. Also, musket men can fire from two ranks but short and longbows can also shoot from rear ranks (on the flat as well as at a higher target) and half of the hits from rear ranks are counted. Troops also get a save if the firer has moved. Troops on battlements get a 4+ cover save. However, those shooting at the defenders are firing upwards so all ranks and units behind can fire at once. Mounted archers can move up to 3/4 move and still shoot either to the front or from the side. Unlike other horse troops there is no penalty for shooting from horseback with the assumption that they are used to riding and shooting bows from horseback since childhood.
Heroes and characters generally have multiple attacks and wounds, usually two but occasionally three. With each wound lost there is one less attack. When all wounds are lost the character is either permanently dead or 'unconscious', depending on the number of 'lives' he has left. If he falls in enemy controlled land he is usually taken prisoner.
Heroes and characters generally have multiple attacks and wounds, usually two but occasionally three. With each wound lost there is one less attack. When all wounds are lost the character is either permanently dead or 'unconscious', depending on the number of 'lives' he has left. If he falls in enemy controlled land he is usually taken prisoner.
Commander Status: In this battle my commander has higher battlefield intelligence which means that dice rolls for setting up first and first move may be forced to be rerolled if the initial result favors the Fezians.
ORDER OF TROOPS
Survivors after wounded are treated
BEERSTEIN
Commander: King James 1
Hero: Prince Frederick Fallen
Wizard, Umanara Lore of Life (formerly Fezian service) 1
24 Musket 24
24 Musket 24
24 Musket 24
24 Longbow 24
24 Musket 24
24 Longbow 24
24 Heavy infantry 0
14 Heavy Mounted Merc Bowmen 10
14 Light Mounted Merc Bowmen 9
12 Mounted merc Lights 0
12 Mounted merc Lights 0
2 Siege guns and 3 guns with 20 crewmen 1 siege gun, 2 guns 16 crew
12 Mounted Crusader Knights Plate 0
12 Mounted Crusader Knights Plate 11
12 Mounted Crusader Knights Plate 11
Supply wagons left in adjacent hex intact
TOTAL
104 Men 53 Losses
FEZIA
Commander, Mamduk 1
Heroes:
Aneesh fallen
Baitan 1
Bagher fallen
Tohgi fallen
24 Militia 12
24 Lights 24
24? Lights 0
24? Lights 0
24 Light Spearmen 0
24 Light Bow 12
24 Light Bow 21
24 Light Bow 12
24 Light Bow 21
24 Plate Infantry 0
24 Plate Infantry 0
12 Heavy Infantry with spears 12
14 Light Bow Mounted 0
14 Light Bow Mounted 8
Cannon and crew of 4 0 crew, gun survives
Cannon and crew of 4 0 crew, gun survives
TOTAL TOTAL LOSSES
224 men 116
NOTES ON LOSSES
'Fallen' heroes indicates it has not yet been ascertained if they are unconscious or dead-dead. Fallen Fezian heroes are mostly in areas under Beerstein's control so are likely to be become prisoners.Characters cannot return to battle until the second map move.
Unit totals at end of battle includes return of half casualties except for units wiped out. When an army vacates the field then it is one quarter casualties return for surviving units.
LOSS OF CANNON CREW
Cannons can be recrewed next battle by taking men off other units. However, a cannon crewed only by non-artillery men have a more difficult time. instead of a 1 signifying a misfire it is 1-2. Also it is minus 1 for shotting, which takes a way long range shooting. If a gun is only partially crewed by inexperienced men then it is only minus one for shooting.
CAMPAIGN CONTINUES
Next battle will mark map move 14. No other encounters have occurred so the only battle happening is continuation of this one. The Beersteiners wish to take the castle and now have an entry point through the destroyed gate, although this is blocked by wagons. The Beersteiner musket men also have ladders. There is no moat around this castle.
Although Fezian losses have been twice as high and as Beersteiner ones Beerstein has lost just over half its army whereas Fezia has just over 50% remaining so Beersrtein might have to do a leadership check for its army. As the Beersteiners are 'winning' in terms of inflicting 2 to 1 casualties there might be an extra dice roll to see if the test must be taken. On the other hand the castle is not taken. King James Leadership is high but there is a small chance of failing a test and thus withdrawing from the field. (These toy soldier battles are bloodthirsty but these toy soldier fights but there are limits to what even toy soldiers can take). (Just did a recount and Fezia has also suffered over 50% casualties).
Expect a report soon on the follow-up battle.


Comments
Post a Comment