Bogavanian Incursion Into Beerstein Hex 163 Repelled
Mathew launched a small invasion force over Beerstein's Southern border. It found itself facing a larger Beersteiner force stiffened by artillery.
BOGAVANIAN FORCE
Commander: Mamdooh el Hag
UNITS SURVIVORS (Includes recovered casualties)
24 Plate Knights 4 captives of Beerstein
24 Heavy Infantry 6
24 Heavy Infantry 13
24 Longbow 12
24 Longbow 19
12 heavy Cavalry 0
5 Supply Wagons 5
BEERSTEIN SURVIVORS
Commander Tobias 1
Hero, Claude Munster 1
Hero, Jonis Munster 1
Wizard, Costrom, Lore of Metal
UNITS
24 Plate Knights with halberds 22
24 Pike Heavies 19
24 Pike heavies 23
24 Muskets Red 24
24 Muskets Yellow 18
24 Muskets Red 22
24 Longbow 0
2 Siege guns 2
2 guns 2
2 guns 2
8 Supply Wagons 8
Interestingly, the Bogavanian commander was, uncharacteristically, a Fezian, which just goes to show how close have become the links between Fezia and Bogavania.
Commander Mamdooh was well informed of the enemy positions: (Translation - despite the Beersteiner commander Ben's superior battlefield intelligence mat won the roll off to see which army set up first). This allowed Mat to concentrate an attack on the weaker right flank of the Beersteiners.
The Beersteiners opened up with the four cannons that had range and line of sight on Bogavanian positions. Damage was negligible. Then they had to spend a move reloading the cannons. The Bogavanians took advantage of this pause to charge forward the foot knights and mounted Heavy cavalry. The casualties from Beersteiner missile fire was insufficient to stop the onslaught. Both cavalry and knights ploughed into the archers.
The wizard Costrom had been captured by Beerstein in the last campaign and he was turned to Beersteiner service. He cast magic to enhance the archers' shooting accuracy and then their prowess in melee. This was insufficient to prevent their inevitable fate.
Even as the archers were being massacred the artillery crews of four cannons turned to focus on the enemy survivors of the melee.
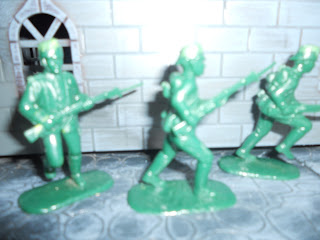
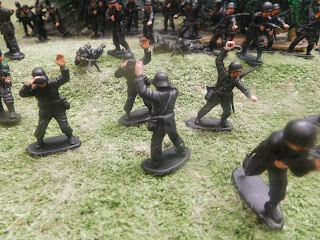
BELOW: Bogavanian archers on the weaker Bogavanian right flank face overwhelming advancing Beersteiner numbers.

.jpg)
.jpg)
.jpg)

.jpg)


.jpg)
CONCLUSION
The Bogavanians had initial success in their assault on the Beersteiner right wing. However, the two assaults from Bogavanian heavies were stymied. My knights stopped, mauled and pushed back one unit. One of my musket units had inflicted sufficient casualties on the other heavy infantry to weaken its assault and then pushed them back, blocking the Bogavanian archers' line of sight.
The Bogavanian cavalry were shot to pieces by my artillery and the Bogavanian knights were severely reduced in numbers.
My left flank were overwhelming the Bogavanian right wing which consisted of a single unit of archers.
Having lost over half their army the Bogavanians made a leadership test which resulted in a general retreat. All remnants were able to retreat, except for the knights who were to close to Beersteiner forces.
The Bogavanian retreat was actually not a bad result as they would live to fight another day and to defend the Bogavanian capital. I didn't have cavalry to cut off their retreat. However, as they abandoned the battlefield they got only a quarter of casualties back.
That was the end of Campaign Move 6. later this week Mat and I will do our hidden map moves. It is expected that multiple battles will eventuate. We have been averaging two tabletop battles a month.
The battle was less unbalanced than I expected it to be and Mat put up a good fight.


Love that barrel-wagon, Q. I always write up returns/casualties on my wargames blog. Its a bit of a chore, but gives a more complete view of the game to the visitor, and a more complete record for the players. Nice post.
ReplyDeleteMichael
Thanks. The barrels, with wagons, used to come with cheapo Chinese made cowboy and Indian sets.
ReplyDeleteThe record keeping is imperative with campaigns. The casualty record I have simplified to half return for the next battle (or quarter if that army abandons the field). I could have said they have to be cared for x-number of campaign turns before returning to battle, but that would have been too complicated. It also gives incentive to protect diminishing units as our rule is that if a unit becomes completely casualties none 'come back'.
Units that become POWs also do not get any casualties back. (They were not that humanitarian in those days to tend the captured enemies wounds, unless, sometimes, if they were leaders or worthy of ransom).